WELCOME TO WKchatx WEBSITE
The easy to use Free IRC client program
MP3 player, tags, and a lot more, no scripts needed.
100% clean from viruses, trojans or backdoors. TRY IT!
|
WKchatx Tutorial - How to use it WKchatx IRC Client Installation |
| (this tutorial has not been updated since 2010) |
| 1 - Installation |
|
Extract all files from SETUP.ZIP into the same folder. After youre done so, run setup.exe. Wait until it finishes and you're ready to go. |
| 2 - Updating the version |
|
To update WKchatx version, download the new version, and extract into your desktop, run the update you extracted on your desktop. Remember to keep a back up copy. |
| 3 - Adding a new server / connecting to a server |
|
To connect to a server, after you load the IRC client, on TOP MENU, choose FILE, then go to SERVER LIST, click NEW, add the new server and then click OK. Now you have added a new server to the list, you may add other servers too as well when required. To connect select the server you want from the list and click CONNECT. To remove, select the server and click REMOVE.
To change to another server select a server of your choice and click the button GO TO |
| 4 - Joining a channel |
|
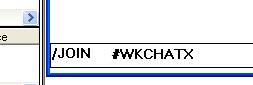
On this client you don't need to type the join channel command. It's much easier. All you have to do is, go to FILE, CHANNELS wait until channels list has finished loading, then type the channel name (with or without the #) you want on the first blank field and click JOIN. And you're ready to chat.
|
| 5 - Sign in |
|
With WKchatx IRC client you don't need to type the new nick command manually
and neither identity manually, this information you need enter once only
and WKchatx will auto sign in on connect. (See Control Window of the Client)
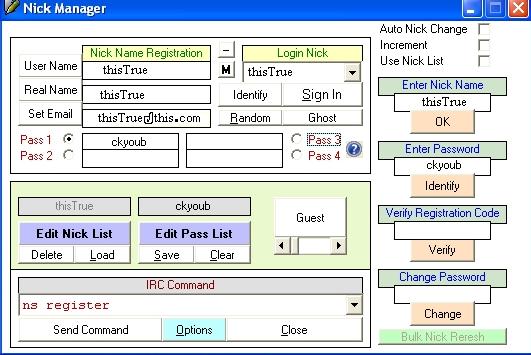
You may add your nicknames and passwords to sign in and be identified automatically. You may add as many nicknames as you like, and up to 4 passwords.
Click EDIT NICK, a notepad window will load, add one nickname per line. Click EDIT PASSWORD, another notepad window will load, add a password per line.
You may also update the username by typing a new username on the field and clicking the button UPDATE USERNAME, Repeat process for REAL NAME UPDATE.
To set an email address for your registered nick type the email on the SET EMAIL ADDRESS field, and click the button SET EMAIL ADDRESS. After you have done all, click save.
Use delete button to remove saved nick names.
Nick Manager window content example: Login instructions with a registered Nick Name 1) Edit Nick List
2) Edit Pass List 3) Exit WKchatx & restart client 4) Open Nickserv Window & Select your password from pass 1 to
pass 4. 5) Select or Type in your Nick Name. Use dropdown Combo
list 6) Click on Sign In Button.
|
| 6 - Tools |
| 6.1 - Word Converter |
| Here is where you can convert
a word/text into another. On the 2 gray fields below you add the word you
will type on the first and the word you want it to show on the second. Click on ADD to save. To update one select one from the list, re-type what you want to change
below and click UPDATE.
After you finish working you must enable Word Converter this is set by the Control window.
|
| 6.2 Tag Maker |
This is what you use to create colorful decorated lines. In those colorful squares is where you choose the letter color, and the background. The UP squares go for letter colors, the BOTTOM squares go for the background. Then now all you need to do is click on one of the white squares above, choose the background for it below, then the font color. Type whatever you want in the white squares, and then copy the copy from the top and paste to use it. |
|
6.3 - Tag Pincher 7 - Chat 7.1 Chat Options |
|
7.2 Block Query |
| Select this Option to block all private chats. |
| 7.3 Direct query to main |
| Select this option to show all private texts on main chat window. |
| 7.4 Normal Mode |
| 7.5 Chat list |
|
Uncheck or check this option to show or hide the Favorite rooms, Active rooms, Private chats list on the left side. |
| 8 Control |
| Click on control to open a new
window.
A & B Color will show words in 2 colors like a rainbow 3 colors will show words with 3 colors like a rainbow. To use it go to C:\cab and create a file f3.col, and inside of it with notepad write the number of the 3rd color from 00 15. (The file must be f3.col extension NOT txt.) |
| 8.2 Tags in text. (bordered texts) |
| Go to C:/cab, load the file STOLEN TAGS.txt, put youre tags or text borders in that file and save as a txt, one per line. Exit and load the chat client again. Select the tag from the bottom field where its written NONE. |
| 8.3 Pvt guard |
| Select this to protect you private chat windows and avoid closing them by accident. |
| 8.4 Fonts off |
| Check this option to turn off all font effects. |
| 8.5 Sounds |
| Select this option to turn the client sounds on |
| 8.6 Word converter |
| Select this option to turn word
converter on |
| 8.7 Quit message |
| Select this to turn the quit message on, write your quit message on the blank field that will load when you click to exit the client. |
| 8.8 - Auto Sign in |
| Select this so the client will
remember your last used nickname and sign you on and identify you automatically. |
| 8.9 Away Text On |
| Select this to set yourself as away and send out an away message automatically. Write a new away message by clicking OTHER SETTINGS. |
| 8.10 Caps on |
| Select this to write all words 1st letter in caps automatically. |
| 8.11 Adding a favorite room |
| Select the room you want to be on favorite list from the active room list (in the control window), and click MAKE FAVORITE. |
| 8.12 Image background |
| In this chat client you can use
any image .jpg as background for your main chat window. On the CONTROL WINDOW, click OTHER SETTINGS below. Click LOAD BACKGROUND to load your jpg image, then click SAVE. Reload the chat window to see the background set. |
| 9 User list |
| 9.1 Private chat |
| Right click on the nickname on
the chat room user list, and choose NEW QUERY. |
| 9.2 Notices |
| Right click on a persons nickname
and choose SEND NOTICE to send a notice to the person. |
| 9.3 Emotions |
| Right click on a persons nickname, choose emotions and choose any emotion button to send to the person. You can create your own sentences by loading file C:/cab/emotions.txt Add one sentence per line and save. |
| 9.4 Whois |
| Do the whois by right click on a nickname and choosing WHOIS. |
| 10 Other options |
|
Click 2 times on any nickname to load a new window. On this window you can do a lot of things On the top on the NICK FIELD, where you find the nickname written. Erase
the nickname you see, and write any nickname you wish. |
| 10.1 Friends |
| Click add as friend, to add the person on your friends list. Nicknames on your friends list can still send you private messages even when you have your private chats blocked. The letter E on top lets you edit your friend list, and letter D lets you delete people from it, select the name from the list below 1st. |
| 10.2 Ignored |
|
Here is your ignore list. Click Ignore user to add anyone to the list. Select a nickname from the list below it and click D to delete from the list. You can click PRIVATE CHAT to private the nickname you wrote above. |
| 11 List |
| Use the left list to navigate
around your active rooms, or private chats without having to minimize the
windows to find another. Click on any room on your favorite rooms list to join it. |
| 12 Chatting |
|
Write any message on the chat room fields and hit enter to send your message or click send. Click A to send the action text instead. |
| 13 MP3 PLAYER |
| Go to tools Media Player, to open
the mp3 player Click the button Browse to browse the songs. Select the song you want to play from the list and click the button play to play. You can create your play list by selecting the song from the list and clicking add. You can save your play list by clicking save. And you can load it by clicking load. You can create your songs display tags (design) by clicking the button tag and inserting the color codes, tag codes, design codes into the 6 fields. Each field is correspondent to a part of the song displaying. |